
When we first moved into our new home, one of the biggest surprises (and joys!) was how much space we had. Coming from a charming but snug Baltimore City rowhome, it felt like a dream. In the old house, Pat worked from the basement while I squeezed a desk into our bedroom—functional, but far from ideal. So, when house hunting, two dedicated offices quickly became non-negotiables.
We decided to turn the first room off the entryway into Pat’s office. Originally designed as a formal living room—the kind with nice furniture no one ever sits on—it had great bones: generous size, a large opening, and a clear view from the front door. It had potential, but definitely needed some love.
Before we moved in, we made two big updates: we had the whole house painted white (goodbye, dark beiges and reds) using Sherwin Williams Alabaster, and refinished the dark red floors to a white oak look. We also installed large French doors to separate the office from the main living space—one of the best decisions we made.
Fast-forward 2.5 years (yikes!) and we were finally ready to give this space some personality. The office turned into a catch all with paper drapes and was usually closed off so nobody could see it.

The Vision: Earthy, Moody, and Plant-Friendly
Pat wanted a soft, earthy green that wasn’t too dark—a color that would pair beautifully with lots of plant life. My starting point? A pair of green plaid IKEA curtains that I couldn’t stop thinking about. I carried them around like a security blanket through multiple paint stores, bringing home more swatches than I care to admit. Nothing felt right.
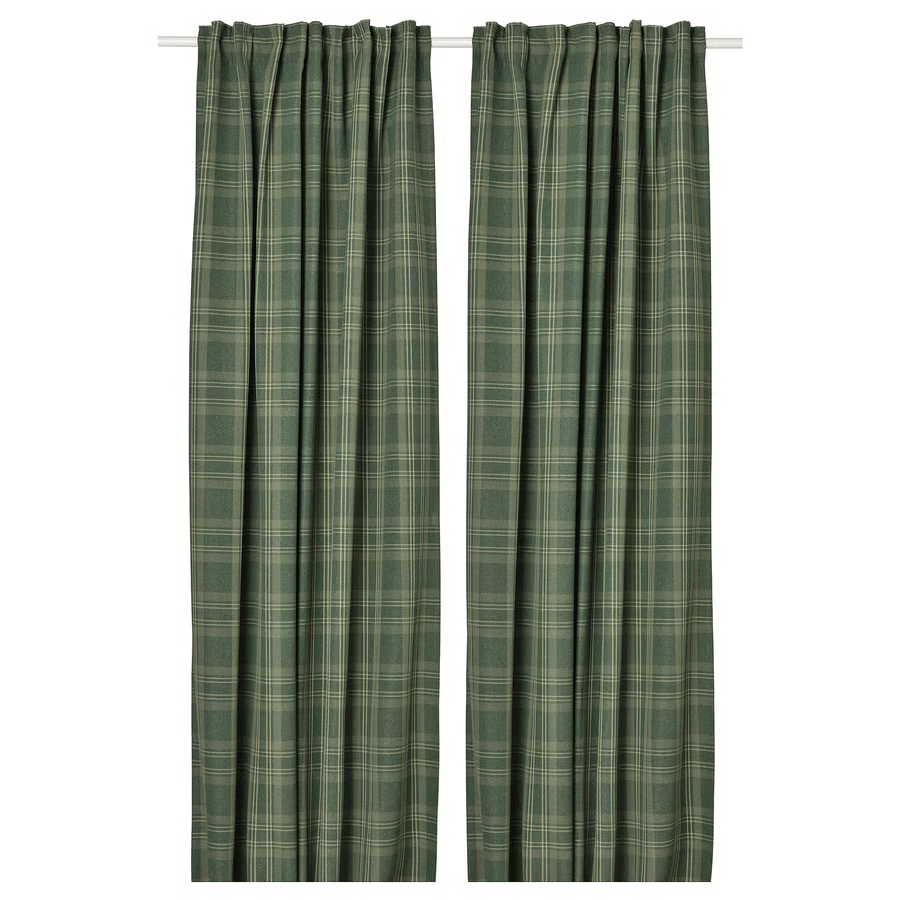
So, I asked ChatGPT for help and uploaded a photo of the curtains. It suggested Backwoods by Benjamin Moore—and wow, it was perfect. The website says it’s “A blackened shade of forest green that bares a hint of welcoming warmth” aka exactly what I was looking for.
The Paint Plan: Color-Drenched & Cozy
I knew I wanted to color drench the entire space, which meant painting the ceiling, trim, and walls in the same shade of green but using different finishes:
- Flat for the ceiling
- Semi-gloss for the trim
- Eggshell for the walls
Step 1: The Ceiling
I started with the ceiling by painting the outside of the canned lights then using a roller on an extended pole for the rest. Two coats were necessary to fully cover the white. I didn’t tape anything off at this point since the trim would be painted later.

Step 2: The Trim
Once dry, I taped off the ceiling edges and windows and painted all the trim—crown molding, baseboards, and window frames—with semi-gloss. Again, two coats with a brush. I didn’t bother taping the walls since I’d be painting over them anyway. But I did end up taping the hardwood after a little mishap (ahem, green-streaked floorboards… oops).

Step 3: The Walls
Next, I tackled the walls. If you’re insane like me, you let your kids paint the walls first :). It was messy but they had so much fun and it was a cute memory!

To finish the walls, I cut in along the trim and around the outlets with a brush and used a roller for the rest. Two coats again. Honestly, since everything was the same color, slight imperfections were totally invisible. It gave me so much freedom!

I also highly recommend these outlet covers. They can be painted and blend in seamlessly to a dark wall.

Step 4: The Door
Ah, the French door. The dreaded final step. Taping each individual glass pane was tedious, and while there are products you can paint on and peel off afterward, the reviews were mixed, so I skipped them. If I ever do this again on more windows, I might give it a try.
I painted the door panels in eggshell like the walls and used semi-gloss on the trim. One tip: think through what parts of the door you want visible from outside. I kept the outward-facing side white, and painted the interior green—including the inner edge you see when the door is open. It looks so clean and intentional.

The Result: Warm, Moody, and So “Us”
I am obsessed with how this room turned out—especially with the plaid curtains. The office finally feels like an extension of our home: grounded, intentional, and full of warmth.
Stay tuned—I’ll be sharing a post soon on how I added box trim to elevate the space even more as well as some great decor finds!

🛠 Products Used in This DIY Office Makeover
- Paint Color: Benjamin Moore Backwoods – used on walls, trim, ceiling, and interior side of door
- Paint Finishes:
- Flat (Ceiling)
- Eggshell (Walls + Door)
- Semi-Gloss (Trim)
- Curtains: IKEA Green Plaid Curtains – affordable + perfect inspiration
- The IKEA curtains are currently sold out in the green plaid, these are also a great option!
- Curtain Rods: Wood curtain rods
- French Doors: Custom-installed – large glass-paneled French doors for separation and light
- Paint Tools:
- Painting set (rollers, tray, extension pole)
- Extension pole (if you already have paint rollers)
- Paint brushes (for trim and cutting in)
- Painter’s tape (especially for floor and door edges) – I’d grab a few!
- Drop cloth (larger is better, I used 9×12)
- Outlet Covers: These paintable covers blend perfectly


Leave a Reply